
Growing Microgreens at Home: Tray Setup, Care & Harvest
Growing microgreens at home starts with a small tray, suitable seed, fresh growing medium and a place where seedlings can receive enough light. The goal is a short crop of tender shoots, cut above the growing surface. Start with one variety and one manageable tray so you can check moisture and learn what healthy growth looks like.
This guide covers microgreens in growing mix. It is a different project from growing larger salad leaves: our indoor lettuce guide explains that later harvest stage. A microgreen tray usually gives one crop, then you sow again. For pea-specific seed preparation, tender-tip cutting and possible regrowth, follow our indoor pea-shoot growing guide.
Choose edible microgreen seeds
Buy untreated seeds intended for edible microgreen production from a reputable supplier. Read the crop name and instructions before opening the packet. “Organic” is not a reason to skip checking suitability, seed treatment and sowing directions. South Dakota State Extension explains why treated seed is unsuitable when the young shoots will be eaten.
Radish, broccoli, kale and mustard are useful options to consider for a first tray. Choose one whose flavor you enjoy; mustard and radish can be quite assertive. A single species makes uneven emergence easier to interpret. Add a second variety in a separate tray once you have a workable routine. For another peppery windowsill crop, our garden-cress indoor growing guide covers sowing, moisture checks and clean harvesting.
Do not assume every vegetable has edible seedlings. Illinois Extension specifically excludes tomato, pepper and eggplant microgreens because their stems and foliage contain toxins. Grow those crops to their appropriate edible harvest instead.
Microgreens, sprouts and baby leaves are different
Microgreens are cut young shoots grown in a medium, typically as their first true leaves appear. The earliest leaves are seed leaves, or cotyledons; true leaves follow and resemble the adult crop. Sprouts are commonly eaten with seed and root, while baby leaves are grown longer for a leafier harvest.
| Project | Harvest | Plan for |
|---|---|---|
| Microgreens | Young stems and leaves cut above the medium | A small batch followed by a new sowing |
| Sprouts | Often the whole germinated seedling | A separate sprouting method and food-safety guidance |
| Baby salad leaves | Larger, developed leaves | More growing time and appropriate spacing |
The RHS microgreens activity uses the appearance of true leaves and sturdy seedlings as a harvest cue. Check the crop instructions rather than cutting solely because a calendar date has arrived.
Build a simple tray setup
Use a clean, food-grade growing tray with drainage and a separate tray to collect water. Choose a size you can move, drain and harvest comfortably. A large commercial flat is optional; it does not make sense if only half of it fits beneath your light. Our drainage guide explains why an ordinary catch tray should not leave roots standing in excess water.
Use fresh commercial seed-starting or lightweight potting mix suitable for this crop. In the UK, look for an appropriate peat-free seed or potting compost. Dense soil dug from the garden is a poor starting choice for an indoor tray. Keep the bag closed and use clean tools. Our potting mix guide explains the different product labels.
Keep a small watering container, fine mister for germination, clean scissors and a label nearby. Mats are another growing route, but follow the mat-and-seed supplier’s hydration instructions rather than treating a dry mat like potting mix. Start with one method before comparing equipment.
Sow microgreens in four stages
1. Prepare and moisten the medium
Clean the working surface and wash your hands. Fill the tray with the crop’s recommended depth of mix, leaving room below the rim. Moisten evenly and let surplus water drain. Break up large lumps without pressing the medium into a hard slab. Keep the tray level so later watering does not collect in one corner.
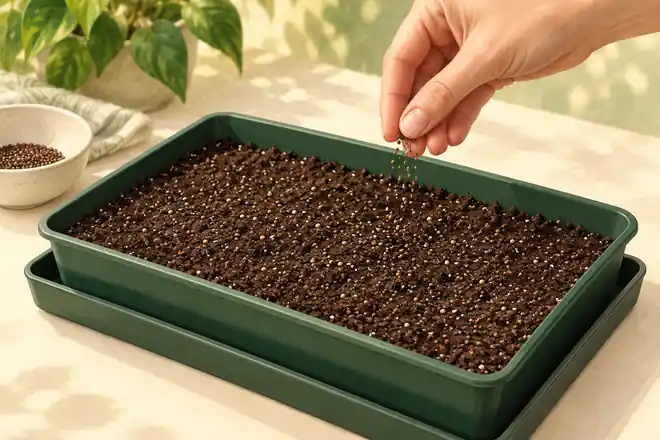
2. Spread the measured seed evenly
Use the packet’s microgreen sowing rate for your tray area. Seed sizes differ, so a spoonful that works for one crop is not a universal dose. Scatter across the whole surface with space between seeds; avoid heaps. Gently press for contact. Follow the crop instructions for covering, rather than automatically burying every seed.
Penn State’s home-growing guide describes surface sowing and notes that larger, hard-coated seeds may benefit from soaking. Follow the specific seed instructions; soaking is not a compulsory step for every microgreen.
3. Manage germination moisture
Keep the seed surface moist with gentle watering that does not wash seeds aside. Where instructions call for a cover, check beneath it and ventilate. A cover helps retain moisture; it should not become an excuse to ignore the tray. Remove it as appropriate when seedlings emerge.
4. Move into active growth
Provide light across the tray and watch for upright, healthy leaves. Label the variety and sowing date. If the crop uses a blackout period, follow its instructions rather than leaving all seedlings in darkness for a fixed week. Compare growth at both ends of the tray before deciding the setup is working.
Light, watering and airflow
A bright windowsill can suit some crops, but winter days and nearby obstructions may limit growth. A lamp can provide more consistent coverage. For planning, Maryland Extension’s indoor-greens guidance suggests about 16 hours of total light daily. Follow your fixture’s recommended distance and leave a dark period; lamp intensity and coverage also matter.
Keep the growing mix moist, with air around the plants. Once seedlings are established, bottom watering through drainage holes can avoid splashing mix onto edible shoots. Add a shallow amount to the outer tray, let the mix absorb what it needs and remove excess. Check the tray rather than applying the same quantity every day.
Leave room around trays instead of sealing a crowded shelf. Vent covers and avoid strong airflow that dries one edge rapidly. Our container watering guide supports the habit of checking moisture before adding more water.
For this short, early harvest in potting mix, Maryland’s guide says extra fertilizer is unnecessary. Hydroponic mats and crops kept longer can need different management. Do not apply an unrelated mature-vegetable feeding schedule to a tray of young shoots.
Harvest above the growing surface
Inspect the crop for healthy development and follow its recommended leaf stage. Use clean scissors to cut shoots above the medium, leaving roots behind. Keep blades clear of the mix and collect shoots in a clean bowl. Work in small sections so cut stems do not fall onto a dirty surface.

Purdue’s microgreens guide describes cutting above the growing medium and storing a harvest in the refrigerator. Harvest only what you can use promptly. If storing unwashed shoots, keep them refrigerated in a clean container and rinse with potable running water before eating. Dry gently after rinsing.
Plan a fresh sowing rather than relying on the cut tray to regrow. Wash and sanitize reusable trays according to an appropriate product’s directions, rinse where required and dry. For a simple first routine, use fresh growing medium in the next batch.
Keep edible shoots clean
Use drinking-quality water, clean hands and clean harvest tools. Keep pets away from the growing and harvest area. Do not place a tray where raw-food preparation can splash it. Penn State’s microgreens food-safety guidance explains that warm, moist growing conditions can also support harmful bacteria; tidy-looking plants are not proof that every contamination risk has gone.
Do not eat a crop with mold, a bad smell or rotting patches. Discard a contaminated tray rather than trimming away the obvious area or spraying it with an improvised household remedy. Clean the equipment before trying again. Rinsing produce is part of handling, not a way to rescue spoiled greens.
Troubleshoot before sowing a bigger batch
Uneven emergence: check seed age, distribution and whether the medium was evenly moistened. Record what happened before adding extra seed to an already developing tray.
Thin, leaning shoots: review light coverage and crop crowding. A stronger fertilizer dose does not replace adequate light.
Wet patches or collapsing seedlings: reassess drainage, covers and seed density. Remove an affected batch if contamination or decay is suspected.
White fuzz: fine root hairs can occur close to young roots, while mold may spread across the medium or seedlings. Appearance alone can be ambiguous. Seek identification when unsure and do not eat a questionable crop.
Start the next tray when you have learned how long the first variety takes in your conditions. Stagger small sowings around your household’s use instead of filling several trays at once. For longer-lived indoor crops, see the windowsill herb garden guide.
Frequently asked questions
Can I grow microgreens without soil?
Yes. Purpose-made mats provide an alternative to potting mix. Choose a suitable crop and follow the system’s water and nutrient instructions. “Soilless potting mix” and a hydroponic mat are different products.
How long do microgreens take to grow?
Many crops take roughly one to three weeks, but seed type and conditions change the timing. Follow the packet and inspect leaf development. Slower herbs should not be forced into the same schedule as a quick radish crop.
Do microgreens grow back after cutting?
Plan on one harvest for a beginner tray, then sow fresh seed. Some crops have different shoot-harvesting methods, but repeated regrowth is not a reliable promise for every microgreen.
Can ordinary garden seeds be used?
Only when the species is suitable and the seeds are untreated and appropriate for edible seedling production. Read the label and ask the supplier when unsure. Start with seed specifically sold for microgreens if suitability is unclear.