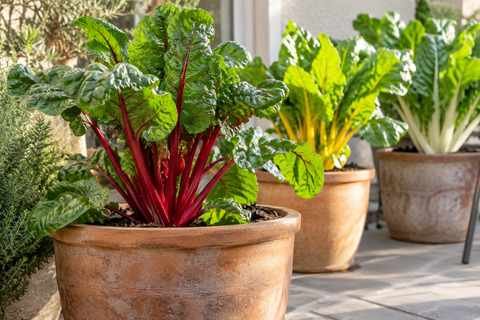
Growing Swiss Chard in Containers: Sowing to Harvest
Growing Swiss chard in containers gives you edible leaves and colourful stalks without needing a vegetable bed. For a long-lived mature plant, choose a substantial drained pot, use vegetable potting mix, keep moisture consistent and harvest a few outer leaves at a time. Leave the young centre intact for the next round of growth.
Chard can also be grown densely for baby leaves, but that is a different project from raising large cooking leaves. This guide helps you choose between them, sow and thin sensibly, and manage a patio or balcony pot through changing weather.
Choose chard for leaves, colour and available space
Swiss chard is a leaf crop of Beta vulgaris, the same species as beetroot. It is not spinach and will not give you a swollen beetroot harvest. UF/IFAS’s chard guide describes edible leaves and stems in several colours. A rainbow seed mix contains plants with different stalk colours; one plant need not produce every colour.
Bright Lights is useful when colour is part of the appeal; Fordhook Giant has white stems. Read the packet for the plant’s expected size and intended use. For a first container, choose one variety or mix and label it. That makes it easier to compare what you planted with how the plants develop.
| Harvest aim | Container and spacing approach | Main trade-off |
|---|---|---|
| Large cooking leaves | For a conservative first setup, one plant in a pot at least 40 cm (16 in) wide and deep | Uses more floor space but avoids crowding |
| Baby salad leaves | A broad drained container; thin plants to roughly 5–8 cm (2–3 in) apart for young picking | Plants are kept small rather than left to mature densely |
| Several mature plants | A larger trough with around 30 cm (12 in) between plants, adjusted to variety | Measure the actual planting area, not just the outer pot length |
The RHS chard guide recommends a large container at least 40 cm wide and deep and distinguishes mature from baby-leaf spacing. Its separate young-leaf container project uses a shallower setup. Choose the approach first instead of combining the smallest pot with the largest harvest expectation.
When to sow: UK and US conditions differ
For the UK, the RHS gives April to July for direct outdoor sowing. Local warmth, variety and shelter still matter. Indoor modules can give you plants to set out after acclimatisation, but starting early is only helpful if outdoor conditions will suit them when they are ready.
In colder US regions, prolonged early cold can trigger premature flowering. Minnesota Extension’s spinach and chard guide recommends waiting until the more suitable spring window for chard rather than treating it exactly like early spinach. That regional advice is not a nationwide date.
Florida illustrates the contrast: UF/IFAS lists September to May in North and Central Florida and September to March in South Florida. In any region, use the local extension sowing calendar and actual weather. Our garden planner can help organise location, month and light, but its broad estimates still need that local check.
Prepare a container that can hold moisture and drain
Choose a stable pot with open drainage holes and place it before filling. Allow space around it to reach the leaves without leaning over a railing. A large decorative cachepot without an outlet is not ready to use as a growing container; see our guide to container drainage holes for the practical checks.
Fill with a vegetable container mix, also called potting compost on UK bags. Maryland Extension’s container guide explains the importance of air spaces as well as water retention around roots. Use our potting-mix guide to compare bag labels and starter-feed information. Leave a watering gap and moisten the mix evenly.
Sow, thin and transplant step by step
Read the packet’s sowing depth. Utah State University gives ½ in (about 1.3 cm) for seed sowing, while some RHS instructions use a deeper covering. Follow one suitable method for your seed and conditions rather than adding those depths together. Sow sparingly, cover and water gently.
The knobbly seed units can produce more than one seedling, as explained by UC Master Gardeners, so check each planting position after emergence. For one mature plant, keep the strongest seedling and remove its immediate competitors. Snipping unwanted stems at mix level can avoid pulling on neighbouring roots. For baby leaves, thin across the whole container to the chosen young-leaf spacing.
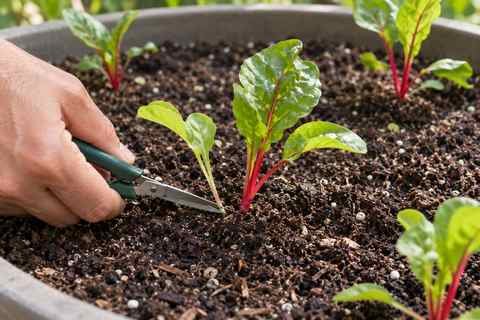
If using modules, move a healthy young plant with its root ball supported. Set it into prepared mix, settle gently and water in. Gradually expose indoor-grown plants to outdoor conditions first. Our seed-starting and hardening-off guide walks through that stage. Do not leave several seedlings together simply because they arrived in one nursery cell.
Light, watering and feeding through the season
Choose a bright outdoor position; aim for about six hours of direct sun where practical. Some light shade in summer can help in a hot spot, but deep shade is not the same thing. Observe the pot at different times: a balcony that gets morning light in spring may be shaded later by neighbouring plants or structures.
Check the growing mix regularly, especially during wind or heat. Water the root zone slowly when it needs moisture, allowing excess to escape, and empty an ordinary saucer afterwards. Do not wait for repeated wilting. Our container watering routine explains how to use observations rather than a fixed timer.
Chard can survive some dryness, but survival and active leaf production are different outcomes. Minnesota Extension notes that dry periods can stop new leaf growth. After correcting moisture, allow time for recovery before expecting another picking. Leaves will not expand simply because a pot received one quick splash.
Read both the growing-mix bag and fertiliser label before feeding. Once any starter charge is used, follow a product intended for edible container crops. Maryland’s container-maintenance advice explains why watering and limited root volume affect nutrient management. Avoid stacking multiple feeds or converting garden-row fertiliser quantities directly into a pot dose.
Check leafminers, slugs and damaged leaves
Inspect leaf surfaces, undersides and the base of the pot. Pale winding or blotchy areas inside a leaf can indicate leafminer feeding; holes alone do not identify the pest. Look for slugs and other visible feeders before deciding on control. Remove badly affected leaves selectively and avoid stripping an already small plant.
Fresh container mix does not make a crop pest-proof. UF/IFAS recommends identifying problems before treating container vegetables. Use crop-appropriate exclusion or hand removal where practical. If a pesticide is needed, its label must allow the edible crop and the planned harvest timing; ornamental-plant products are not interchangeable.
Harvest chard without removing the next crop
Wait until the plant has several healthy leaves and is growing actively. Cut a few outer stalks cleanly near the base, leaving the central young leaves and growing point undamaged. Take small amounts from several plants if you have them rather than repeatedly stripping one. Utah State describes outer-leaf harvesting as a way to let younger leaves keep growing.

Seed-packet days to maturity are approximate. Wisconsin Extension’s salad-greens guide emphasises that weather and crop stage affect harvest timing. Judge usable leaves and plant recovery as well as the calendar. Large stems can be cooked separately from the leaf blades because their texture is different.
Pick into a clean container and refrigerate promptly. Before preparing chard, rinse it under running water; do not use soap or detergent. FDA guidance on safe produce handling applies to homegrown produce too. Discard rotten material and keep leaves away from raw-meat utensils.
Troubleshooting and winter expectations
| Problem | Check before acting | Practical response |
|---|---|---|
| Slow or small leaves | Crowding, light, moisture and feed history | Correct the limiting condition before adding fertiliser |
| Wilting in wet mix | Drainage and standing water | Clear the outlet and reassess watering; do not keep topping up |
| Tunnels or blotches in leaves | Look for leafminer signs and other damage | Identify the cause and remove heavily damaged leaves as needed |
| Flower stalk developing | Plant age, earlier cold and weather stress | Expect declining leaf quality; plan replacement rather than endless picking |
Chard can overwinter in some sheltered settings, but cold and short days slow growth. Surviving winter does not mean providing a fresh bowl of leaves every week. An established plant may resume growth in milder weather; a late, tiny seedling has a different starting point. For exposed pots, use our frost-protection guide and the local forecast.
Frequently asked questions
Can I grow Swiss chard in a window box?
Yes, for a planned young-leaf crop if the box drains and has enough growing mix. For large stalks and mature leaves, give plants the larger container and wider spacing described above.
Why do several seedlings come from one seed?
Chard seed units can contain more than one embryo. Thin the resulting group to your intended spacing instead of treating the cluster as one full-grown plant.
Will rainbow chard produce all colours on one plant?
A rainbow mix generally supplies plants with different coloured stalks. Keep labels and compare individuals; colour variety across the pot collection is different from every plant changing colour.
Does chard bolt as quickly as spinach?
It usually behaves differently from day-length-sensitive spinach. Cold exposure and plant age matter, and flowering is still possible. Avoid describing chard as bolt-proof or assuming an old plant will crop indefinitely.
A simple first Swiss chard container
Start growing Swiss chard in containers with one generous pot, a local sowing plan and enough room for the harvest style you want. Thin early, keep moisture steady and take outer leaves conservatively. That is easier to manage than a crowded display that looks full on planting day but has no space to develop.