
Growing Garden Cress Indoors: Sow, Water and Harvest
Growing garden cress indoors starts with a shallow draining tray, clean seed labelled Lepidium sativum, moist growing mix and a bright position. Sow evenly, keep the surface from drying out and cut sturdy young seedlings above the mix with clean scissors. For this short seedling crop, plan a fresh sowing after harvest rather than relying on repeated regrowth.
A small tray fits a winter windowsill and gives peppery leaves for sandwiches or a garnish. Cornell’s garden-cress guide identifies this crop as suitable for winter windowsill gardens. Its quick growth is useful, but light, temperature and seed quality still affect when a particular tray is ready.
Choose garden cress, not just anything called cress
Read the botanical name on the packet. Garden cress is Lepidium sativum; watercress and land cress are different crops with different growing needs. A packet sold as mustard and cress may contain a mixture. For a first attempt, one clearly identified crop makes it easier to judge emergence and harvest stage.
Buy seed intended for edible seedling or microgreen production from a reputable supplier, and follow its instructions. Do not substitute treated ornamental seed or an unidentified spice seed. Store unused seed dry and keep the packet so you can check its sowing advice and batch information if a tray performs poorly.
This guide focuses on a garden-cress seedling tray. For equipment choices across several crops, see our broader microgreens-at-home guide. Garden cress is a particular plant; “microgreens” describes a young harvest stage, not a separate species.
Compost or tissue: choose a method you can monitor
For the main method here, use a clean tray with drainage and about 3–4cm (1–1½in) of fresh seed-sowing mix or fine potting mix. UK labels often call this peat-free seed compost. Leave watering space below the rim. A small container is easier to keep under observation than a large tray you cannot reach or rotate.
| Growing surface | Useful for | Main limitation |
|---|---|---|
| Seed compost or potting mix | A supported seedling crop in a draining tray | Keep harvested stems clear of the mix. |
| Damp kitchen tissue | A small short-term cress project | The thin surface can dry quickly; watch moisture closely. |
| A deeper pot for larger leaves | A longer-growing cress project | It needs different spacing and care from a dense seedling tray. |
The RHS Plants common-cress instructions describe both compost and damp kitchen tissue. Tissue is an option, but it does not remove the need for light, clean handling and moisture checks. Avoid glitter, dyes, fragranced materials or containers that previously held chemicals.
Use a detachable catch tray beneath drainage holes. Do not leave the growing tray submerged in water. If you reuse equipment, remove old roots and debris, clean it thoroughly and let it drain before starting again. Fresh medium makes a first trial easier to interpret.
Sow a small, even batch
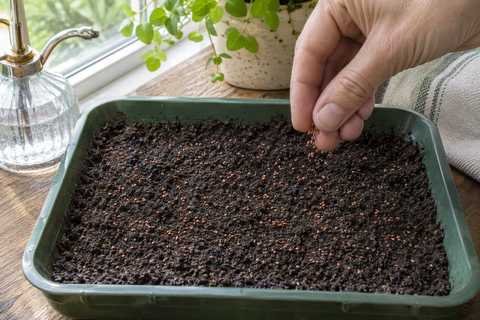
Moisten the mix before sowing, then let excess water escape. Level the surface gently rather than packing it hard. Scatter the small brown seeds evenly, aiming for a single layer without piles. Dense sowing for young seedlings does not mean burying the surface under several layers of seed.
Press seeds lightly into contact with the damp medium. Follow the packet on covering depth; for a compost-based seedling crop, only a very light covering is needed. The RHS school microgreens method includes cress, premoistened compost and a thin covering. Outdoor instructions for a longer-grown plant can differ from a quick indoor tray.
Label the tray with the crop and sowing date. A clear cover can help retain moisture during emergence, but check underneath and remove it once seedlings appear. Do not keep a growing crop sealed in stagnant, humid conditions. Water gently so seeds remain spread across the surface.
Give seedlings useful winter light
Move the emerged seedlings into a bright growing position. Turn the tray if the plants lean strongly toward the window. A shelf across the room may look bright to your eyes while providing too little light for compact, sturdy growth. Long, weak stems are a reason to reassess the position.
In the UK and northern US, short winter days can make supplemental lighting useful. Use a suitable LED growing light with a timer and follow the fixture’s guidance for coverage and distance. Our grow-light setup guide explains the practical positioning decisions. Leave a daily dark period rather than running a lamp continuously.
A heated room does not solve weak daylight. Keep trays away from freezing glass and drying radiator airflow. A milder US location may offer better winter light, but still check the actual sill. Indoor sowing has no single outdoor frost-date schedule; a tray on an unheated porch is a different situation from one inside a stable room.
Keep moisture steady without adding unnecessary feed
Inspect the tray every day while learning its drying pattern. Feel the medium at an accessible edge and look for dry patches. Add water gently when needed, then drain excess. Avoid both a completely dry seed surface and mix that stays saturated beneath apparently healthy leaves. A calendar reminder should prompt a check, not automatic watering.
For the brief seedling harvest described here, extra fertiliser is usually unnecessary. University of Maryland Extension explains that seeds supply the nutrients for this early growth stage. A pale tray needs checks of light, moisture and seedling health before anyone reaches for plant food.
Do not apply outdoor garden feeding rates to a little indoor tray. If you choose to keep plants for larger leaves, use a separate, properly spaced setup and appropriate container guidance. That is a different project from cutting a dense batch of young cress.
Troubleshoot the tray before starting another
| Problem | Check | Practical response |
|---|---|---|
| Patchy emergence | Seed age, sowing evenness and dry spots | Adjust the next sowing; do not flood ungerminated seed. |
| Long, floppy seedlings | Light and excessive warmth | Improve light and move away from hot airflow. |
| Wilting in dry mix | Whether the root zone has dried | Water gently if needed; badly damaged seedlings may not recover. |
| Collapsed seedlings, slime or spreading mould | Saturation, crowding and hygiene | Discard the affected food crop and clean equipment before restarting. |
Do not taste a suspect tray to decide whether it is usable, or assume washing will rescue a decaying crop. Keep pets and dirty tools away from the growing area. If small flies appear, our fungus-gnat identification guide can help you investigate the source; avoid unlabelled sprays on edible seedlings.
Harvest above the mix, then start fresh
Look for sturdy seedlings with green leaves and emerging true leaves, rather than using the date alone. Cress is quick, and some batches reach a useful stage in roughly two weeks, but a cold or dim position can slow them. Keep scissors above the growing medium and cut a small section without pulling roots into the harvest.
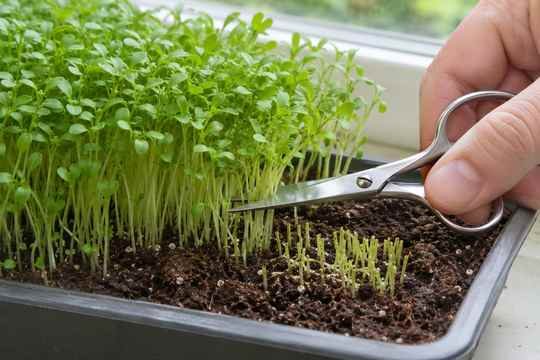
Wash hands before handling the crop. Rinse harvested cress under plain running water and dry carefully with a clean towel. The FDA’s fresh-produce advice recommends running water rather than soap or produce wash. Washing reduces contamination; it does not make spoiled greens suitable to eat. Use promptly or refrigerate what you keep.
For this cut seedling crop, plan to resow rather than count on the stubble producing another worthwhile harvest. Start another small tray when you know how quickly you use the first one. For a different indoor salad crop with an outer-leaf harvest routine, compare growing lettuce indoors.
Frequently asked questions
Can cress grow indoors all year?
Yes, when the growing position provides suitable light and moisture. Winter may require extra light, while a hot summer sill may overheat or dry quickly. Indoor growing still needs seasonal adjustments.
Does garden cress need deep soil?
A shallow tray suits the short seedling crop here. Larger, longer-grown plants need more root space and wider spacing. Decide which harvest you want before choosing the container.
Should I soak cress seeds first?
Follow the supplier’s instructions for your specific seed. Do not copy soaking schedules intended for peas or larger seeds. This tray method begins by moistening the growing medium before sowing.
Can I eat the roots too?
For this compost-grown method, harvest clean stems and leaves above the surface and leave roots in the tray. Do not treat it as a jar-sprouting method where the entire sprout is harvested.
Keep the first tray manageable
Start with identified garden-cress seed and a small, clean tray. Sow evenly, watch moisture and light, and harvest without bringing growing mix into the kitchen bowl. A repeatable small batch is more useful than a large tray that dries out or goes unharvested.