
Growing Pea Shoots Indoors: Sowing, Care & Harvest
Growing pea shoots indoors starts with edible pea seed, a clean draining tray, fresh growing medium and enough light to produce sturdy green growth. Sow a small batch, keep it moist without saturation, and harvest tender leafy tips above the growing medium. You are growing young leaves and stems, not waiting for a crop of pods.
A single tray fits a kitchen growing area and lets you practise a complete sow-to-harvest routine. Start with the quantity you can use fresh rather than filling every windowsill. The useful measure is a clean, healthy batch that you enjoy harvesting.
Pea shoots, sprouts or peas for pods?
| Crop | What you harvest | What to plan for |
|---|---|---|
| Pea shoots | Tender upper stems, leaves and young tendrils | A short indoor growing cycle and a small tray |
| Pea sprouts | The much younger germinated seedling, often including seed and root | A different growing method and food-safety considerations |
| Peas for pods | Pods or seeds from a more mature plant | More growing space, time and usually support |
This guide covers shoots grown in a medium and cut above it. Our general microgreens guide compares other tray crops; growing snap peas in containers covers the separate goal of harvesting pods.
Choose edible seed and clean equipment
Use Pisum sativum seed sold by a reputable supplier for edible shoots or microgreens. Check that it is untreated and suitable for that use. Keep the packet so you can identify the variety and follow its instructions. Whole, viable seed is needed; cooked, split or frozen peas are not a substitute.
Do not confuse edible peas with ornamental sweet peas, Lathyrus odoratus. NC State lists sweet peas as poisonous. Keep ornamental seed packets separate from edible growing supplies, even when the pictures and common names look similar.
- A food-safe tray with open drainage holes and a separate catch tray.
- Fresh seed-starting medium or a commercial medium suitable for edible microgreens.
- A clean bowl, potable water and a small watering container.
- Clean scissors and a clean container for the harvest.
- A bright growing position, with a suitable grow light if natural light is inadequate.
Wash trays and tools before starting and follow any sanitising-product label where applicable. Use fresh medium for a new batch instead of reusing a tired, root-filled tray. Keep sowing equipment away from raw meat preparation, pet areas and dirty outdoor tools.
Sow your first tray step by step
1. Measure a single layer of seed
Before soaking, spread dry peas across the empty growing tray to judge how much you need. Aim for a close, even layer without piles. This practical check is more useful than a universal spoon measurement because pea size and tray area differ. Return any excess to the packet before adding water.
2. Soak according to the supplier’s directions
UF/IFAS lists an eight-to-twelve-hour soak for peas. Follow the directions for your seed lot if they differ. Use a clean bowl and potable water, then drain promptly. Leaving seed soaking for extra days does not turn it into a better shoot crop.
3. Fill, sow and cover lightly
Fill the draining tray with premoistened medium and level it gently without packing it hard. Spread the drained seed in one layer, pressing lightly for contact. Add the light covering recommended for your seed. A small starting tray makes it easier to notice whether the centre is wetter than the edges.
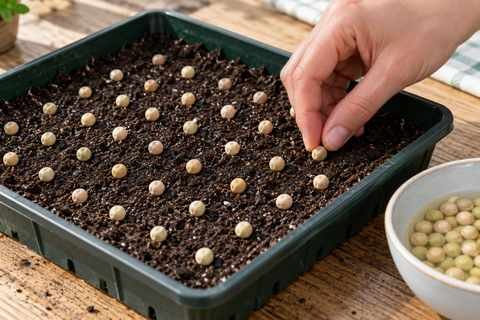
A loose cover can help retain moisture during germination, but inspect the tray daily and remove the cover as shoots emerge. Do not leave leafy growth sealed in a humid box. Follow the seed supplier’s guidance instead of keeping every batch covered for an identical number of days.
Light and watering after emergence
Give emerging shoots a bright position. Watch for leaning, pale growth and long weak stems; those signs call for a light review. A window that supports a tray in spring may be inadequate in a dark northern winter. Avoid placing tender plants against cold glass or immediately above a drying radiator.
If using supplemental light, choose an ordinary plant-growing LED rather than a UV lamp. Set the distance and timer according to that light’s instructions and the plants’ response. Our grow-light setup guide explains distance, timers and observation; pea shoots still need their own spacing and moisture checks.
Keep the medium moist, not waterlogged. Apply water gently, or briefly water from below if your tray setup allows it, then empty the catch tray. Do not top up a reservoir automatically when the root zone is already wet. The principles in our container watering guide apply to trays too.
Avoid handling wet foliage unnecessarily and leave enough room around the tray for air movement. Choose the next watering from the condition of the medium, not from a compulsory daily dose. Read the medium and seed instructions before adding fertiliser; a short first crop does not need an improvised heavy feeding programme.
When and how to harvest pea shoots
Timing changes with variety, warmth and light. The RHS pea-shoot project describes quick growth and harvesting tender tips when plants are around 10–15 cm / 4–6 inches tall. Use the quality of the shoots, not a promised date, to decide when to cut.
With clean hands and scissors, snip the tender top section above the medium, keeping gritty stems, roots and seeds out of the harvest. For a possible second cutting, leave healthy lower leaves and growing points. Mature lower stems can be fibrous, so harvesting the entire tall stem is not always the best way to use the crop.

Pea shoots can produce regrowth when enough healthy plant remains, but a second harvest may be smaller or less tender. University of Minnesota Extension also notes that edible-pod pea varieties suit shoot harvest. Once growth becomes weak, tough or unhealthy, finish that tray instead of trying to keep it indefinitely.
Handle the harvest as fresh produce
Homegrown does not mean free from contamination. UConn Extension’s microgreens guidance emphasises reputable seed, clean growing conditions and prompt use or refrigeration. Discard a batch with visible mould, slime, decay or an unpleasant smell. Do not try to make a spoiled tray usable by rinsing it.
Rinse harvested shoots under running water before eating or preparation. The FDA’s produce-handling guidance advises against soap or household detergent and notes that washing reduces, but does not eliminate, bacteria. Keep shoots separate from raw meat and its utensils.
Harvest close to the time you will use the crop. If storing, keep it in a clean container in the refrigerator at 4°C / 40°F or below, avoiding excess surface moisture. Check its condition and use it promptly; a storage-time estimate is not a guarantee that a particular batch remains suitable to eat.
Troubleshooting a small indoor tray
| Problem | Useful first check |
|---|---|
| Poor or uneven germination | Seed suitability and age, soaking directions, moisture distribution and room conditions |
| Long pale shoots | Light strength and position; avoid a dim shelf chosen only for convenience |
| Collapsed or slimy plants | Excess moisture, contamination and crowding; discard affected batches |
| Tough harvest | Plant age and cutting position; choose younger tips next time |
| Weak second crop | How much healthy lower growth remains; sow a fresh tray rather than promising regrowth |
Frequently asked questions
Can I grow pea shoots indoors in winter?
Yes, if you can provide suitable indoor conditions and sufficient light. Winter is not a guarantee of a slower or faster crop; the actual growing position matters.
Will supermarket dried peas grow?
Some viable whole peas can germinate, but a product sold as food does not automatically provide the same seed-lot guidance as seed sold for edible shoots. For a first batch, use an appropriate labelled seed supply.
Do pea shoots need a trellis?
A tray intended for tender shoot harvest normally finishes before a full climbing support is needed. Peas grown on for pods have different space and support requirements.
Can I harvest pea shoots more than once?
Sometimes. Leave healthy lower leaves and growing points if trying regrowth, and judge the new growth before using it. Replace an unhealthy or exhausted tray.
Start growing pea shoots indoors with one clean tray and a modest sowing. Keep a note of the seed, light position and harvest quality before starting your next batch. For a wider small-space garden, use the SproutWish Garden Planner to organise the pots you want to add alongside your tray.