

Growing Garlic Greens Indoors: A Winter Windowsill Guide
Growing garlic greens indoors means planting individual cloves of culinary garlic (Allium sativum) in a draining pot, giving them strong light and snipping tender leaves for the kitchen. Keep the potting mix lightly moist and harvest modestly. This small windowsill project produces garlicky greens; it is not a shortcut to a new head of garlic.
The University of Kentucky’s winter indoor-gardening guidance includes garlic greens among crops that can grow in a few inches of potting mix. A small pot can fit beside cooking herbs, provided the leaves receive useful light rather than simply decorating a dim shelf.
Garlic greens, green garlic and scapes: know the difference
Garlic greens are the young leaves. “Green garlic” can also mean an entire immature plant lifted before its bulb has divided into mature cloves. Scapes are the flower stalks produced by hardneck garlic during its normal growing cycle. Do not expect a little indoor leaf pot to produce all three crops.
Choose the harvest before planting. Repeated leaf cutting takes away the foliage a plant would use to develop a bulb. For an outdoor crop intended for curing and storage, use our separate growing garlic in containers guide and leave healthy leaves intact. Keep your indoor greens pot separate from that project.
Choose sound cloves of known culinary garlic
Start with firm, healthy cloves from a reputable source. Named planting garlic is useful because its identity and growing purpose are clear; check that any treatment permits the intended edible crop. Never use ornamental bulbs or an unidentified plant that merely smells garlicky. This guide covers cultivated garlic, not foraged wild garlic.
A clove that has started sprouting can be used if it remains firm and free of rot. Reject soft, mouldy, leaking or badly damaged cloves. Keep the papery skin around each sound clove and avoid cutting its base. A dry loose wrapper is different from fuzzy growth on the clove itself.
The RHS garlic guide recommends named planting varieties and cautions against supermarket garlic for outdoor growing because of suitability and disease concerns. An indoor sprouting experiment with a food clove does not establish that it is good planting stock for the garden. Keep materials clean and do not transfer suspect plants outside.
Set up a small pot with drainage
For a first batch, use a clean pot holding about 2 litres of mix, with room for a few cloves spaced apart. Choose roughly 10–15cm (4–6in) of growing depth. NC State Extension’s container handbook lists green garlic with a 2-quart container, 4in spacing and 4–6in minimum depth. Treat these as starting dimensions, not a reason to crowd a tiny bowl.
Check for unobstructed drainage holes and place the pot on a detachable saucer. Fill with fresh potting mix; UK bags may call this peat-free potting compost. Use a medium intended for containers rather than dense garden soil. Leave room beneath the rim so watering does not wash mix across the windowsill.
A decorative outer pot is fine if you can remove the inner pot and drain it. Avoid a permanently wet cachepot, and skip gravel layers beneath the mix. Put the container somewhere stable, away from food-preparation surfaces where spilled mix would be troublesome.
Plant cloves with the pointed end up
Moisten the mix before planting so it is evenly damp, not dripping. Separate cloves just before use. Make a planting hole, lower a clove with its flat basal end down and its pointed tip up, then cover the tip with about 1cm (½in) of mix. Leave space between planting positions and firm gently without crushing the clove.
The City of Zion’s garlic-greens project uses this basic upright planting method and shallow covering. Water slowly until excess drains, empty the saucer and label the pot with the planting date. If a shoot is already visible, keep it upright and handle it gently.

You do not need to sow seed, peel cloves bare or soak them in a homemade treatment. Start with a small batch so you can learn how quickly your particular pot dries. If nothing emerges, check the clove’s condition and the growing conditions before assuming that more water is the answer.
Give the leaves winter light, not radiator heat
Place the pot at your brightest suitable window and rotate it when growth leans strongly. In the UK and northern US, short winter days and low sunlight can limit leaf quality even in a heated room. A sunny-looking room is not necessarily a well-lit growing position behind a deep sill or curtain.
If growth becomes pale and floppy, improve the light. A suitable LED grow light on a timer can supplement daylight; follow its instructions for distance and duration, and leave a daily dark period. Our small-space grow-light setup guide explains how to position equipment without using one universal lamp distance.
Keep leaves away from freezing glass and avoid hot, drying air from heaters. Indoor leaf production does not depend on a single US/UK outdoor planting date. In a mild US region you may have better winter daylight, but still judge the actual window and leaf growth rather than the state’s general climate.
Water by checking the mix; feed cautiously
Inspect the pot regularly. When the surface starts drying, feel just below it and consider the pot’s weight. Water when the root zone needs it, then let excess escape. The aim is lightly moist mix with air around roots, not a daily dose into already wet compost. Small terracotta pots and heated rooms can dry at different rates.
The clove supplies reserves during early growth. Do not add strong fertiliser to force pale leaves to grow faster. Read whether your mix already contains nutrients. If a healthy planting is retained longer and feeding is needed, use a product labelled for edible plants at its container rate. Fertiliser cannot replace light or revive a rotten clove.
| What you see | Check first | Next step |
|---|---|---|
| Pale, leaning leaves | Light reaching the foliage | Improve the growing position or supplemental light. |
| Yellow leaves with wet mix | Drainage and clove firmness | Empty trapped water; discard rotten planting material. |
| Dry tips and a very light pot | Root-zone moisture and heater exposure | Water if dry and move away from hot airflow. |
| Little regrowth after cutting | Remaining foliage and clove exhaustion | Reduce harvesting or replace with a fresh healthy batch. |
Watch for insects around the mix and on leaves. Isolate a suspect pot, identify the problem and avoid spraying an edible crop with a product intended only for ornamental houseplants. Our fungus-gnat identification guide helps distinguish small flies around damp compost from a reason to add more feed.
Harvest tender leaves and plan for replacement
Wait for established green growth before taking a small cutting. Snip an outer leaf with clean scissors, leaving some green growth and the central young leaves to continue. Cut only what you need. Regrowth depends on light, remaining leaf area and the clove’s condition; do not plan on an endless supply from the same cloves.
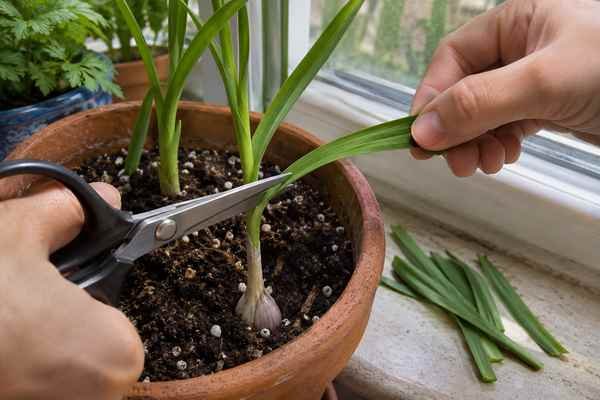
When new growth becomes consistently weak, replace the planting rather than repeatedly cropping a spent clove. For another pot of kitchen alliums, compare regrowing green onions in water or soil. They are a different crop with their own care routine.
Wash hands before preparing the harvest, rinse leaves under running water and dry with a clean towel. The FDA’s produce-handling advice says soap or produce wash is unnecessary. Keep harvested leaves away from dirty growing mix and use promptly; refrigerate any you keep. Add a small amount to eggs, soups or other dishes where a gentle garlic flavour fits.
Frequently asked questions
How long until I can cut garlic greens?
Healthy cloves may start shooting within a week or two, but a visible sprout is not automatically ready for harvest. Wait for useful, established leaf growth. Cold, weak light or old planting material can slow progress; use the plant’s condition rather than a promised harvest date.
Will an indoor clove make a whole garlic bulb?
That is not the aim of this setup. Bulb production depends on variety, season, light and often cold exposure, with adequate foliage retained. Treat the indoor pot as a short-term leaf crop and use a separate outdoor plan for bulbs.
Can I grow the cloves in water instead?
Cloves can sprout, but a jar is a different setup and needs careful water management. This guide uses draining potting mix to support roots and make moisture easier to judge. Do not submerge cloves and assume that water alone creates a permanent crop.
Are garlic greens the same as garlic chives?
No. Garlic greens here are leaves of Allium sativum; garlic chives are a different species. For a maintained clump rather than repeatedly planting cloves, see our indoor chives guide and check the plant label for its identity.
Start with one small batch
Use sound culinary cloves, a draining pot and the best light you can provide. Check moisture before watering and harvest lightly. A modest pot of garlic greens is a practical way to keep growing through winter while setting realistic expectations about regrowth and replacement.


