Raised Bed Irrigation: Drip Layout, Setup and Watering
Raised bed irrigation works best when water reaches the active root zone evenly and you can adjust the system as crops grow. For closely planted vegetables, inline drip tubing is a practical starting point. A suitable soaker hose can work in a small, level bed, while hand watering remains useful for newly sown seeds and checking individual plants.
Start with your bed dimensions, planting pattern and water source. Then test how water spreads through the soil before relying on a timer. This guide focuses on vegetable raised beds; for separate patio pots, see our automatic watering system guide for containers.
Which raised bed irrigation method should you choose?
| Method | Useful for | What to check |
|---|---|---|
| Inline drip tubing | Rows or closely planted blocks | Emitter spacing, operating pressure and line length |
| Individual drip emitters | Widely spaced plants | Coverage as roots expand; emitter flow |
| Soaker or seep hose | Small, relatively level beds | Material suitability and even output along the hose |
| Watering can or gentle hose | Seed rows, young plants and occasional watering | Time, access and moisture below the surface |
The University of Minnesota raised-bed guide notes that raised beds can dry faster than ground-level gardens. Watering near the soil also limits splashing onto foliage. An open-bottom bed connected to garden soil and an elevated planter with a contained growing medium may behave differently, so observe your own setup.
Drip irrigation vs soaker hose for raised beds
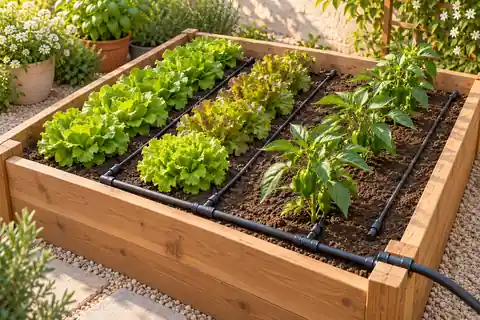
Inline drip tubing has emitters at regular intervals; solid supply tubing carries water without releasing it. Use the solid tubing between beds and the emitter tubing where you want water applied. Individual emitters can suit widely separated plants, but one small wet spot may not cover a larger mature root system.
Soaker hoses release water along their length and can be simple to arrange. They still need testing: a wet section near the inlet does not prove that the far end delivers enough water. The RHS watering-methods guide explains that soil texture affects sideways spread and that seep hoses may water unevenly on slopes. For edible beds, choose hose materials intended for food growing; the RHS advises avoiding porous rubber or recycled-tyre soaker hoses.
For a first bed, compare the full setup and replacement parts rather than assuming one method is always cheaper. A drip kit may offer clearer published flow information, while a basic hose may require more observation to establish useful running times.
Plan the bed layout before buying tubing
Sketch the bed’s length, width, plant rows and route from the water source. Leave paths accessible, and keep connections where you can inspect them without stepping into the bed. Draw separate branches if you have several beds rather than assuming one long tube can serve everything.
For dense planting, parallel emitter lines connected to a supply header can make coverage easier to organise. For scattered larger plants, individual emitters may fit the layout better. Utah State Extension’s backyard drip irrigation guide describes these approaches and the role of filtration and pressure regulation.
There is no universal line spacing for every raised-bed mix. Start from the tubing manufacturer’s layout recommendations, then check moisture between lines as well as directly beneath them. Water spreads differently through sandy soil, finer soil and amended growing media. Oregon State Extension’s Growing Your Own guide explains why soil wetting patterns matter.
As an illustration, a 4-by-8-foot bed with three straight 8-foot laterals needs 24 feet of emitter tubing, plus its header, supply run and fitting allowances. Three laterals are an example for estimating materials, not a spacing recommendation. Confirm coverage before buying or cutting your final layout.
Check the water source and compatible components
- Supply: identify whether you use a mains tap, well, pump or stored rainwater. Check available flow and operating pressure against the kit instructions.
- Backflow protection: ask your water supplier which protection is required for your connection. Permanent mains installations can have different requirements from a temporary hose setup.
- Filter: select the filtration specified for the emitters and source water; plan easy access for cleaning.
- Pressure regulator: match its outlet pressure and minimum flow to the tubing. A regulator reduces pressure; it does not boost a weak supply.
- Compatible tubing and fittings: check actual dimensions, connection type, maximum run length and end closures. Nominal sizes from different systems may not fit together.
- Control: choose a manual valve or compatible timer. Separate zones can help when beds need different watering or the source cannot supply every bed together.
Colorado State Extension’s home drip irrigation guide identifies missing filters, unsuitable pressure and overloaded or overly long runs as common installation problems. Follow the specific kit’s assembly order and limits rather than combining parts by appearance.
For UK mains connections, the RHS vegetable-watering guidance highlights water-supply protection requirements. Confirm the correct arrangement locally before making a permanent connection. US requirements also vary by water provider.
Can a rain barrel supply raised bed irrigation?
It can, if the system is designed for the available pressure and flow. A barrel below the bed cannot supply it by gravity alone. Even an elevated barrel may not meet the requirements of a mains-pressure kit or a standard tap timer. Check the operating range of every component, including filters and valves.
Choose a documented gravity-compatible system or a suitable pump arrangement, and test it with the barrel approaching its lowest useful water level. Plan refill access and filtration, and use water appropriate for edible gardening. Do not assume adding a pressure regulator will make an underpowered gravity system work.
Install and test the irrigation in stages
1. Assemble and flush the supply
Lay out the kit without final cuts first. Connect its specified supply components, route solid tubing to the bed and flush debris through open ends as the instructions direct. Keep supply tubing out of walking routes or protect it against damage.
2. Position and secure the watering lines
Lay emitter lines beside the intended crop root zones and secure them with suitable stakes. Keep bends gentle and leave connections accessible. Cap or close the ends after flushing.

3. Check output across the whole bed
Run the system while you can watch it. Inspect the inlet, joints, corners and farthest line. Look for leaks, kinks, disconnected fittings and emitters that remain dry. If output varies markedly, check the filter, supply capacity and manufacturer’s run-length limits before simply increasing timer duration.
4. Inspect the soil wetting pattern
After a trial run, use a small trowel to inspect moisture beneath and between the watering lines, away from plant stems. Check more than one place, including the far end and bed edges. Avoid disturbing established roots. A wet surface alone does not show the depth or width of coverage.

Oregon State Extension’s irrigation management guidance recommends routine soil checks because soil characteristics change drip wetting patterns. Use those observations to adjust placement or running time, then repeat the check.
How long and how often should you run it?
Use soil moisture, crop stage and recent weather to set the schedule. A fixed daily run may overwater after rain or fall short when plants become larger. UMN Extension’s vegetable irrigation guidance distinguishes soil-based monitoring from simply watering by the calendar.
For planning, total nominal flow equals the number of emitters multiplied by each emitter’s rated flow. Twelve emitters rated at 2 litres per hour deliver a nominal 24 litres per hour, or 8 litres over 20 minutes, at the specified operating conditions. This calculation estimates delivery, not the amount your bed needs. Real output and moisture distribution still need checking.
Keep a short record of runtime, rainfall and soil observations. Change one setting at a time so you can see whether the bed becomes evenly moist. If water pools or runs away before soaking in, reduce the application rate or test shorter runs with pauses; investigate drainage if the bed stays saturated.
Seed rows and very young seedlings may need gentle supplemental watering until their roots reach the wetted area. Established crops can need a different schedule. The RHS vegetable guide links water needs to crop type and growth stage, rather than treating all vegetables alike.
Mulch, maintenance and seasonal care
Test coverage before hiding lines under mulch, and keep their routes recorded. Maintain access to joints and end closures. Recheck placement after harvesting, replanting or moving supports; a line that served the previous crop may miss the next one.
Inspect filters, joints and output during the season and after repairs. Follow the kit’s cleaning and flushing instructions. Before freezing weather, drain or store components as the manufacturer specifies. A timer battery check and a supervised trial are essential before you leave the garden unattended.
If you also grow pots beside your beds, give them a separate moisture check. Our container watering guide, grow-bag watering guide and moisture-meter guide for containers explain why different growing media and container sizes need individual attention. Browse Watering & Tools for related setup decisions.
Frequently asked questions
Is drip irrigation best for every raised bed?
It is useful for many vegetable beds, particularly rows or closely planted blocks. A suitable soaker hose or careful hand watering can also work. Choose by your layout, water source, coverage and maintenance needs.
How many drip lines does a raised bed need?
Enough to moisten the crop root zones across the bed. Bed width, soil wetting pattern, emitter spacing and planting layout determine the number. Check soil between lines before deciding that coverage is sufficient.
Can I leave raised bed irrigation on a timer?
Yes, with a compatible system that has been tested under supervision. Keep checking rainfall, soil moisture, leaks and plant growth, and arrange inspection while you are away. A timer controls duration; it does not confirm that roots received water.
A useful raised bed irrigation setup starts with a clear layout and finishes with a soil check. Begin with one manageable bed, verify coverage and adjust as the season changes before extending the system to the rest of your garden.